In times of smart home, it is becoming increasingly popular to use smart lighting. The software is suitable for this WLED from Christian Schwimme Excellent which open source is and is therefore available free of charge. Since this software is very versatile, you will get to know the functions and furnishings step By step in this blog series, so that you can build smart lighting yourself without much programming knowledge.
Hardware
For the beginning we need:
ESP8266 D1 Mini
WS2812 LED ring
Jumper cable
USB cable
-PC with Chrome / Edge Browser and internet connection
-Lötzubör
The first thing we can do is solve the included shed strip on the microcontroller and a piece of the pen strip to the LED ring. Then we cable the two components with the cables as follows:

|
LED ring |
D1 Mini |
|
DIN |
D4 (GPIO 2) |
|
Gnd |
Gnd |
|
5V |
5V |
installation
Next, connect the board to your computer and open the Installer in the browser. In the drop-down, select the latest release (e.g. 0.14.4).

Source: https://install.wled.me/
Now a window should open in which you have to select the COM port of your board. If you flash an ESP8266 for the first time, the CH340 driver must first be installed (Windows; Mac). If several devices are displayed, you can easily find out the COM port in the device manager. At the end of the flash process, the WLAN access data can optionally be entered.
After the microcontroller has been successfully programmed and has not yet been connected to the network, a WLAN Accespoint with the name: WLED-AP (password: WLED1234) appears. Connect to this network and press on the now opening page Configure WiFi. Enter the access data of the network with which you later want to control the light.
steering
Now your light is connected to your local network. To control it now, you can first load the WLED app on your smartphone (firstAndroid , iOS ). If you open the app and your device is connected to the same network, a device "WLED" should be displayed in the app with an IP address below. If you open the IP address in your browser, the same control page is displayed as in the app.

Without further settings, you can Color picker Select, adjust the brightness, or try one of the many effects. The WLED software has significantly more features.
Let's look at the bar above. Here a timer of one hour can be placed after the light is switched off automatically (e.g. as a night light). Under info Information such as electricity consumption, WLAN signal strength and other system information can be called up. In the last point "Settings" all settings can be made. There are the following subcategories here:
WiFi Setup:

- There you can connect the board to another WLAN,
- Optionally change the IP address (is automatically assigned By the DHCP server!),
- the DNS name Change under which the board in the network is alternatively accessible (here: http: //wled.local),
- Or the settings of the Access point Adjust that opens when no connection can be established.
LED Preferences:

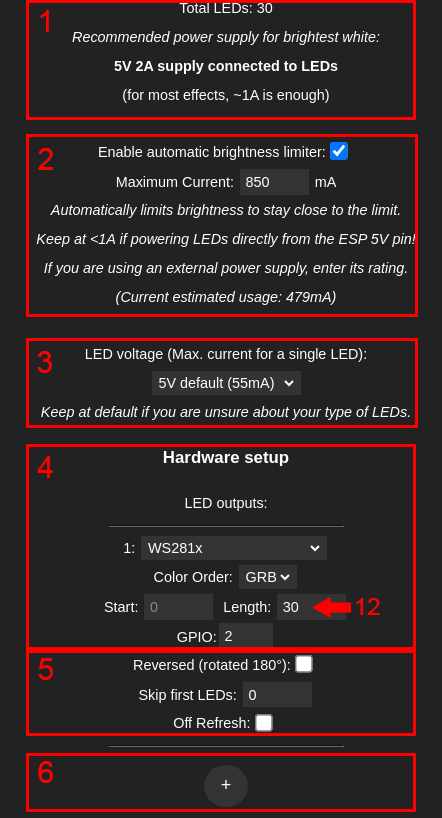
- In the upper area, the number of LED and the expected maximum power consumption (all LED white) is displayed.
- The current of the 5V power supply can be entered there and By activating the Brightness Limmer The brightness is regulated so that the power supply is not overloaded.
- The power consumption of the individual LED can be changed (for the LED ring default let).
- In addition, the LED type (for our LED ring: WS2812), the color order, number of LED and the PIN on the microcontroller can be set.
- Further settings are the reversal of the LED order and the position of the start LED.
- By clicking on the "+", further LED outputs can be added
We set the LED number (Length) to 12 so that it matches the ring from the example.
Note that the GPIO numbering does not use the PIN lettering (D) of the D1 Mini Board, but take into account the GPIO numbers in Pinout.

In the lower part of the LED Preferences you can still set the standard brightness.

- You can activate the gamma correction for the brightness or color. In this, the two parameters are adapted to human perception (more harmonious representation).
- The transition between the colors can also be adjusted.
- The timer from the bar in the user interface can be changed here.
User interface:

- The user interface can be customized there
- The type of color selection can be set (color voters, RGB slider, hex code)
- The general representation can be changed, including the background color or the Dark Mode.
Now that WLED is fully configured, you can divide the ring into segments on the user interface, which can be controlled individually. To do this, just click on this Add segment. Next, enter a name for the segment and below the LED start and end number.
On the right side, presets and playlists can be saved. A preset is a storage of the current setting of the colors. In the settings, under LED PREFERENCES A preset can also be selected, which is automatically used after the start. Several presets can also be saved in a playlist, the stored presets are then automatically played in a row with the waiting time.
After this blog post has introduced the basics of settings and control, you will get to know various applications in the next part.
Have fun recovery :)


